Liberation Mission: Difference between revisions
From The Rockman EXE Zone Wiki
| (37 intermediate revisions by the same user not shown) | |||
| Line 1: | Line 1: | ||
{{nw}} | {{nw}} | ||
Liberation Missions in [[Mega Man Battle Network 5]]. | '''Liberation Missions''' in [[Mega Man Battle Network 5]]. | ||
*Warning: The CusVolt BattleChip series will not drain the gauge during battles. | |||
== | ==Team Field Abilities== | ||
For the Navi abilities in battle, see: [[Team Navis]]. Saving does not use Order Points. In MMBN5DS, no Navis have Save as an ability, instead saving can be done via the Start menu. | |||
{| class="wikitable" | |||
|- | |||
|+Both Versions | |||
|- | |||
!Navi !! Field Ability | |||
|- | |||
| MegaMan || | |||
*LongSwrd: Performs battle. Liberates 2 panels. Panel ahead and the one above that. | |||
|- | |||
|} | |||
{| class="wikitable" | |||
|- | |||
|+Team ProtoMan | |||
|- | |||
!Navi !! Field Ability | |||
|- | |||
| ProtoMan || | |||
*WideSwrd: Performs battle. Liberates 3 panels. Panel ahead and the ones beside it. | |||
*{{GBA}}{{BNLC}} Save: Can save the game once per phase. | |||
|- | |||
| MagnetMan || | |||
*MagnetBarrier: Until the end of the next enemy phase, all Team Navis gain a field Barrier. They will not receive damage from enemy field attacks. | |||
|- | |||
| GyroMan || | |||
*GyroMan can travel over Dark panels by going into Gyro Form, but he can't liberate any panels while in Gyro Form except for his other ability. | |||
*BombLiberation: While in Gyro Form, GyroMan can liberate the Dark panel underneath him without performing battle. | |||
|- | |||
| NapalmMan || | |||
*Napalm: Performs battle. Liberates 6 panels. A "t" shape in the panels ahead. Destroys any Item panels except Keys and Trap panels. | |||
|- | |||
| SearchMan || | |||
*PanelSearch: Performs battle. Liberates any Item panels in the row ahead. | |||
|- | |||
| Meddy || | |||
*TwinLiberation: Performs battle. After the battle, the panel ahead will be marked. Afterwards, if another Team Navi liberates the panel on the other end of the marked panel, all Dark panels in that row will be clear. | |||
*{{GBA}}{{BNLC}} Save: Can save the game once per phase. | |||
|- | |||
|} | |||
{| class="wikitable" | |||
|- | |||
|+Team Colonel | |||
|- | |||
!Navi !! Field Ability | |||
|- | |||
| Colonel || | |||
*ScreenDivide: Liberates 3 panels. Panel ahead and the ones beside it. | |||
*{{GBA}}{{BNLC}} Save: Can save the game once per phase. | |||
|- | |||
| KnightMan || | |||
*KnightMan won't take any damage from field attacks. | |||
*If Knightman is near a Team Navi and they are attacked, KnightMan will teleport and take the hit instead. | |||
|- | |||
| ShadowMan || | |||
*ShadowMan can walk over Dark Panels, but he can't liberate panels if he's standing on any Dark panels. | |||
*SneakAttack: ShadowMan can deal massive damage to a field enemy 2 panels ahead of him without performing battle. Will delete viruses. Darkloids cannot be deleted this way and will go down to 1 HP instead. | |||
|- | |||
| TomahawkMan || | |||
*TomahawkSwing: Performs battle. Liberates 6 panels. 3x2 panels ahead. Destroys any Item panels except Keys and Trap panels. | |||
|- | |||
| NumberMan || | |||
*NumberCheck: Obtain any Item panels in the 3x2 panels ahead without performing battle. The panels are not liberated. | |||
|- | |||
| ToadMan || | |||
*LifeMelody: Boosts a nearby Team Navi for 1 phase. That Navi's normal liberation range is changed to 5 panels ahead. | |||
*{{GBA}}{{BNLC}} Save: Can save the game once per phase. | |||
|- | |||
|} | |||
==Field Advantage== | |||
Depending on the Navi's position on the mission field will affect the field advantage during battle: | |||
*Panels left and right in front of you: +2 points | |||
*Panels left and right of you: +10 points | |||
*Panel directly behind you: +20 points | |||
{| class="wikitable" | |||
|- | |||
|+Field Advantage | |||
|- | |||
!Points !! Advantage | |||
|- | |||
| 0 pt. || Team Advantage | |||
|- | |||
| 1-9 pt. || Normal Field | |||
|- | |||
| 10-19 pt. || Enemy Advantage | |||
|- | |||
| 20-30 pt. || Surrounded | |||
|- | |||
| 31+ pt. || Surrounded (Hard) | |||
|- | |||
|} | |||
*The starting panel advantage will be the base panel count. So when using the GrabBanish series, it will use the panel advantage and not the standard 3x3 panel count. | |||
*For DarkHoles and big viruses, Surrounded (Hard) is the same as Surrounded | |||
*For Navi bosses, Surrounded and Surrounded (Hard) are the same as Enemy Advantage | |||
**Exception is ShadeManβ in Nebula Area 1, it will be considered as Surrounded and Surrounded (Hard), and he is repositioned to the back column instead of the center panel. However, the field will still be set as Enemy Advantage. This results in an Enemy Advantage field but the boss is on the back column. | |||
==Story Missions== | |||
===Mission 1: ACDC Area 3=== | ===Mission 1: ACDC Area 3=== | ||
| Line 10: | Line 113: | ||
**TC: MegaMan, Colonel | **TC: MegaMan, Colonel | ||
*'''Completion Rewards''': | |||
{| class="wikitable" | {| class="wikitable" | ||
|- | |- | ||
! Phases || Item | ! Phases || Item | ||
| Line 22: | Line 125: | ||
|} | |} | ||
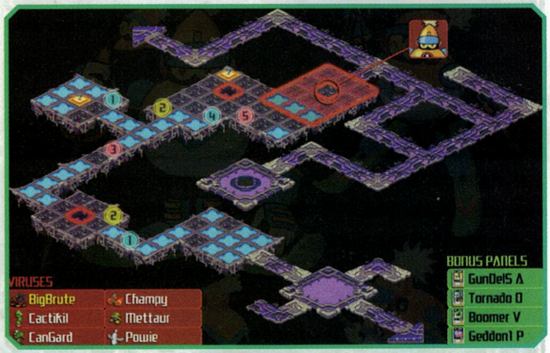
*[[ACDC Area 3 (Liberation Mission)|List of Virus Encounters]] | |||
[[File:MMBN5-Liberation 01.png|550px]] | |||
*'''Items''': | |||
{| class="wikitable" | {| class="wikitable" | ||
!Item Panels || Bonus Panel Chips | !Item Panels || Bonus Panel Chips | ||
| Line 35: | Line 141: | ||
**TC: MegaMan, Colonel, KnightMan | **TC: MegaMan, Colonel, KnightMan | ||
*'''Completion Rewards''': | |||
{| class="wikitable" | {| class="wikitable" | ||
|- | |- | ||
! Phases || Item | ! Phases || Item | ||
| Line 47: | Line 153: | ||
|} | |} | ||
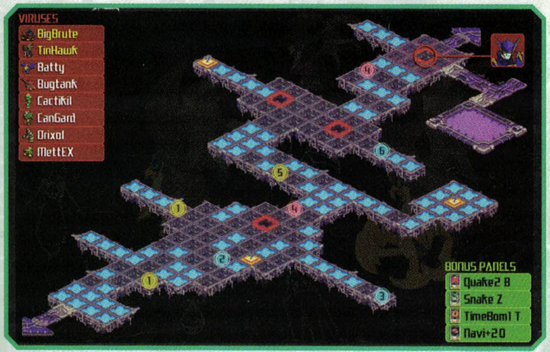
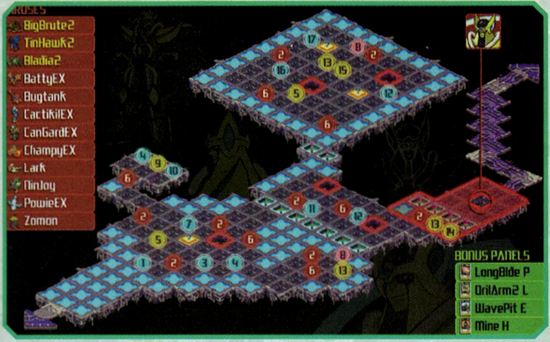
*[[Oran Area 3 (Liberation Mission)|List of Virus Encounters]] | |||
[[File:MMBN5-Liberation 02.png|550px]] | |||
*'''Items''': | |||
{| class="wikitable" | {| class="wikitable" | ||
!Item Panels || Bonus Panel Chips | !Item Panels || Bonus Panel Chips | ||
| Line 60: | Line 169: | ||
**TC: MegaMan, Colonel, KnightMan, ShadowMan | **TC: MegaMan, Colonel, KnightMan, ShadowMan | ||
*'''Completion Rewards''': | |||
{| class="wikitable" | {| class="wikitable" | ||
|- | |- | ||
! Phases || Item | ! Phases || Item | ||
| Line 72: | Line 181: | ||
|} | |} | ||
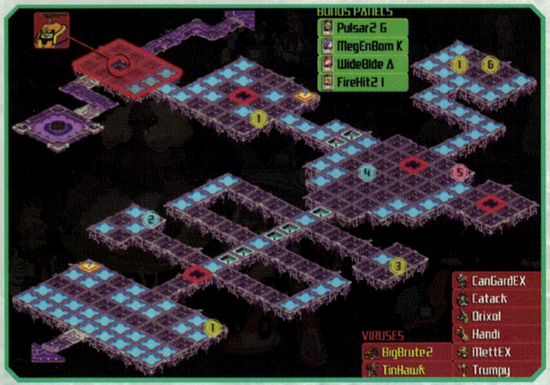
*[[SciLab Area 3 (Liberation Mission)|List of Virus Encounters]] | |||
[[File:MMBN5-Liberation 03.png|550px]] | |||
*'''Items''': | |||
{| class="wikitable" | {| class="wikitable" | ||
!Item Panels || Bonus Panel Chips | !Item Panels || Bonus Panel Chips | ||
| Line 85: | Line 197: | ||
**TC: Colonel, KnightMan, ShadowMan, TomahawkMan | **TC: Colonel, KnightMan, ShadowMan, TomahawkMan | ||
*'''Completion Rewards''': | |||
{| class="wikitable" | {| class="wikitable" | ||
|- | |- | ||
! Phases || Item | ! Phases || Item | ||
| Line 97: | Line 209: | ||
|} | |} | ||
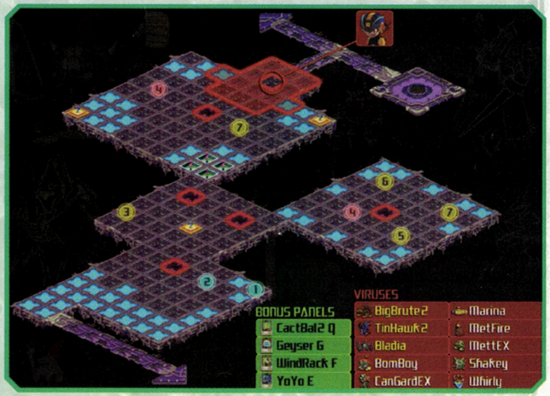
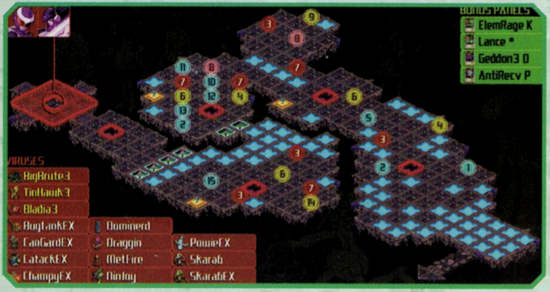
*[[End Area 2 (Liberation Mission)|List of Virus Encounters]] | |||
[[File:MMBN5-Liberation 04.png|550px]] | |||
*'''Items''': | |||
{| class="wikitable" | {| class="wikitable" | ||
!Item Panels || Bonus Panel Chips | !Item Panels || Bonus Panel Chips | ||
| Line 110: | Line 225: | ||
**TC: MegaMan, Colonel, KnightMan, TomahawkMan, NumberMan | **TC: MegaMan, Colonel, KnightMan, TomahawkMan, NumberMan | ||
*'''Completion Rewards''': | |||
{| class="wikitable" | {| class="wikitable" | ||
|- | |- | ||
! Phases || Item | ! Phases || Item | ||
| Line 122: | Line 237: | ||
|} | |} | ||
*[[End Area 5 (Liberation Mission)|List of Virus Encounters]] | |||
[[File:MMBN5-Liberation 05.png|550px]] | |||
*The map has an error, the #2 and #7 by the bottom left Dark Hole are supposed to be swapped. | |||
*'''Items''': | |||
{| class="wikitable" | {| class="wikitable" | ||
!Item Panels || Bonus Panel Chips | !Item Panels || Bonus Panel Chips | ||
| Line 135: | Line 254: | ||
**TC: MegaMan, ShadowMan, TomahawkMan, NumberMan, ToadMan | **TC: MegaMan, ShadowMan, TomahawkMan, NumberMan, ToadMan | ||
*'''Completion Rewards''': | |||
{| class="wikitable" | {| class="wikitable" | ||
|- | |- | ||
! Phases || Item | ! Phases || Item | ||
| Line 142: | Line 261: | ||
|8 or less || Z Saver Z | |8 or less || Z Saver Z | ||
|- | |- | ||
|9 to 10 || | |9 to 10 || {{5TP}} ProtoMan B <br> {{5TC}} Colonel C | ||
|- | |- | ||
|11 or more || 5000z | |11 or more || 5000z | ||
|} | |} | ||
*[[Undernet 4 (Liberation Mission)|List of Virus Encounters]] | |||
[[File:MMBN5-Liberation 06.png|550px]] | |||
*'''Items''': | |||
{| class="wikitable" | {| class="wikitable" | ||
!Item Panels || Bonus Panel Chips | !Item Panels || Bonus Panel Chips | ||
| Line 153: | Line 275: | ||
|<ul><li>ElemRage K <li> Lance * <li> Geddon3 O <li> AntiRecv P | |<ul><li>ElemRage K <li> Lance * <li> Geddon3 O <li> AntiRecv P | ||
|} | |} | ||
==Post-game Missions== | |||
===Mission 7: Nebula Area 1=== | ===Mission 7: Nebula Area 1=== | ||
| Line 160: | Line 284: | ||
**TC: MegaMan, Colonel, KnightMan, TomahawkMan, NumberMan | **TC: MegaMan, Colonel, KnightMan, TomahawkMan, NumberMan | ||
*'''Completion Rewards''': | |||
{| class="wikitable" | {| class="wikitable" | ||
|- | |- | ||
! Phases || Item | ! Phases || Item | ||
| Line 172: | Line 296: | ||
|} | |} | ||
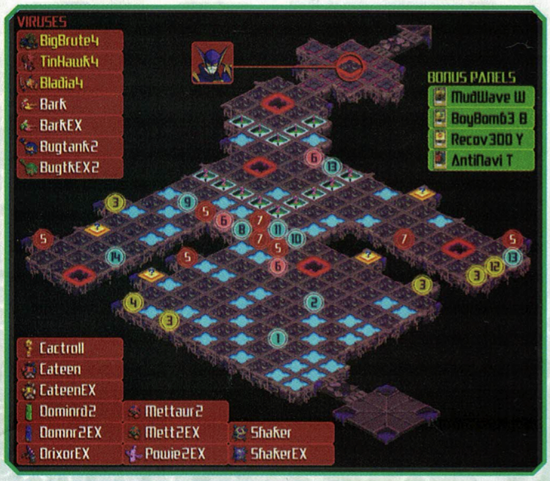
*[[Nebula Area 1 (Liberation Mission)|List of Virus Encounters]] | |||
[[File:MMBN5-Liberation 07.png|550px]] | |||
*'''Items''': | |||
{| class="wikitable" | {| class="wikitable" | ||
!Item Panels || Bonus Panel Chips | !Item Panels || Bonus Panel Chips | ||
|- | |- | ||
|<ol><li>1000z <li> Astroid2 E <li> 3 Order Points <li> BarrierKey2 <li> TRAP (Paralysis) <li> Heart (700 HP) <li> TRAP (100 DMG) <li> 1300z <li> Slasher I <li> 1600z <li> | |<ol><li>1000z <li> Astroid2 E <li> 3 Order Points <li> BarrierKey2 <li> TRAP (Paralysis) <li> Heart (700 HP) <li> TRAP (100 DMG) <li> 1300z <li> Slasher I <li> 1600z <li> CusVolt2 E <li> BarrierKey1 <li> 1 BugFrag <li> HotBody3 J | ||
|<ul><li>MudWave W <li> BoyBomb3 B <li> Recov300 Y <li> AntiNavi T | |<ul><li>MudWave W <li> BoyBomb3 B <li> Recov300 Y <li> AntiNavi T | ||
|} | |} | ||
| Line 185: | Line 312: | ||
**TC: MegaMan, ShadowMan, TomahawkMan, NumberMan, ToadMan | **TC: MegaMan, ShadowMan, TomahawkMan, NumberMan, ToadMan | ||
*'''Completion Rewards''': | |||
{| class="wikitable" | {| class="wikitable" | ||
|- | |- | ||
! Phases || Item | ! Phases || Item | ||
| Line 197: | Line 324: | ||
|} | |} | ||
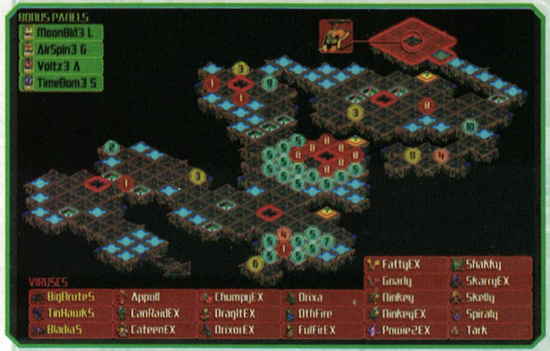
*[[Nebula Area 3 (Liberation Mission)|List of Virus Encounters]] | |||
[[File:MMBN5-Liberation 08.png|550px]] | |||
*'''Items''': | |||
{| class="wikitable" | {| class="wikitable" | ||
!Item Panels || Bonus Panel Chips | !Item Panels || Bonus Panel Chips | ||
| Line 205: | Line 335: | ||
===Mission 9: Nebula Area 5=== | ===Mission 9: Nebula Area 5=== | ||
Note: In the GBA version, there are 2 Navis that can save, giving 2 saving opportunities per Phase. In the DS version, there is only the standard save once per Phase. | |||
*'''Boss''': CosmoMan | *'''Boss''': CosmoMan | ||
**While BlizzardMan appears at the Nebula Area 5 Liberation Mission, his defeat is not required to complete the mission. | **While BlizzardMan appears at the Nebula Area 5 Liberation Mission, his defeat is not required to complete the mission. | ||
| Line 212: | Line 342: | ||
**TC: MegaMan, Colonel, KnightMan, ShadowMan, ToadMan | **TC: MegaMan, Colonel, KnightMan, ShadowMan, ToadMan | ||
*'''Completion Rewards''': | |||
{| class="wikitable" | {| class="wikitable" | ||
|- | |- | ||
! Phases || Item | ! Phases || Item | ||
| Line 224: | Line 354: | ||
|} | |} | ||
*[[Nebula Area 5 (Liberation Mission)|List of Virus Encounters]] | |||
[[File:MMBN5-Liberation 09.png|550px]] | |||
*'''Items''': | |||
{| class="wikitable" | {| class="wikitable" | ||
!Item Panels || Bonus Panel Chips | !Item Panels || Bonus Panel Chips | ||
|- | |- | ||
|<ol><li>Katana3 Z <li> 3 Order Points <li> BarrierKey1 <li> AntiWood M <li> 2000z <li> Heart ( | |<ol><li>Katana3 Z <li> 3 Order Points <li> BarrierKey1 <li> AntiWood M <li> 2000z <li> Heart (900 HP) <li> BarrierKey2 <li> BarrierKey3 | ||
|<ul><li>CusVolt3 P <li> VDoll O <li> SuprVulc S <li> NeoVari V | |<ul><li>CusVolt3 P <li> VDoll O <li> SuprVulc S <li> NeoVari V | ||
|} | |} | ||
[[Category:Mega Man Battle Network 5]] | [[Category:Mega Man Battle Network 5]] | ||
Latest revision as of 07:06, 27 December 2024
| This section is under construction. |
| The information may not be complete or 100% accurate. |
Liberation Missions in Mega Man Battle Network 5.
- Warning: The CusVolt BattleChip series will not drain the gauge during battles.
Team Field Abilities
For the Navi abilities in battle, see: Team Navis. Saving does not use Order Points. In MMBN5DS, no Navis have Save as an ability, instead saving can be done via the Start menu.
| Navi | Field Ability |
|---|---|
| MegaMan |
|
| Navi | Field Ability |
|---|---|
| ProtoMan |
|
| MagnetMan |
|
| GyroMan |
|
| NapalmMan |
|
| SearchMan |
|
| Meddy |
|
| Navi | Field Ability |
|---|---|
| Colonel |
|
| KnightMan |
|
| ShadowMan |
|
| TomahawkMan |
|
| NumberMan |
|
| ToadMan |
|
Field Advantage
Depending on the Navi's position on the mission field will affect the field advantage during battle:
- Panels left and right in front of you: +2 points
- Panels left and right of you: +10 points
- Panel directly behind you: +20 points
| Points | Advantage |
|---|---|
| 0 pt. | Team Advantage |
| 1-9 pt. | Normal Field |
| 10-19 pt. | Enemy Advantage |
| 20-30 pt. | Surrounded |
| 31+ pt. | Surrounded (Hard) |
- The starting panel advantage will be the base panel count. So when using the GrabBanish series, it will use the panel advantage and not the standard 3x3 panel count.
- For DarkHoles and big viruses, Surrounded (Hard) is the same as Surrounded
- For Navi bosses, Surrounded and Surrounded (Hard) are the same as Enemy Advantage
- Exception is ShadeManβ in Nebula Area 1, it will be considered as Surrounded and Surrounded (Hard), and he is repositioned to the back column instead of the center panel. However, the field will still be set as Enemy Advantage. This results in an Enemy Advantage field but the boss is on the back column.
Story Missions
Mission 1: ACDC Area 3
- Boss: BlizzardMan
- Team Members:
- TP: MegaMan, ProtoMan
- TC: MegaMan, Colonel
- Completion Rewards:
| Phases | Item |
|---|---|
| 5 or less | BlizManSP B |
| 6 to 7 | BlizMan B |
| 8 or more | 1000z |
- Items:
| Item Panels | Bonus Panel Chips |
|---|---|
|
|
Mission 2: Oran Area 3
- Boss: ShadeMan
- Team Members:
- TP: MegaMan, ProtoMan, MagnetMan
- TC: MegaMan, Colonel, KnightMan
- Completion Rewards:
| Phases | Item |
|---|---|
| 7 or less | ShadeMnSP S |
| 8 to 9 | ShadeMan S |
| 10 or more | 2000z |
- Items:
| Item Panels | Bonus Panel Chips |
|---|---|
|
|
Mission 3: SciLab Area 3
- Boss: CloudMan
- Team Members:
- TP: MegaMan, ProtoMan, MagnetMan, GyroMan
- TC: MegaMan, Colonel, KnightMan, ShadowMan
- Completion Rewards:
| Phases | Item |
|---|---|
| 7 or less | CloudMnSP C |
| 8 to 9 | CloudMan C |
| 10 or more | 3000z |
- Items:
| Item Panels | Bonus Panel Chips |
|---|---|
|
|
Mission 4: End Area 2
- Boss: Dark MegaMan
- Team Members:
- TP: ProtoMan, MagnetMan, GyroMan, NapalmMan
- TC: Colonel, KnightMan, ShadowMan, TomahawkMan
- Completion Rewards:
| Phases | Item |
|---|---|
| 8 or less | FullCust * |
| 9 to 10 | AntiNavi M |
| 11 or more | 4000z |
- Items:
| Item Panels | Bonus Panel Chips |
|---|---|
|
|
Mission 5: End Area 5
- Boss: CosmoMan
- Team Members:
- TP: MegaMan, ProtoMan, MagnetMan, NapalmMan, SearchMan
- TC: MegaMan, Colonel, KnightMan, TomahawkMan, NumberMan
- Completion Rewards:
| Phases | Item |
|---|---|
| 7 or less | CosmoMnSP C |
| 8 to 9 | CosmoMan C |
| 10 or more | 5000z |
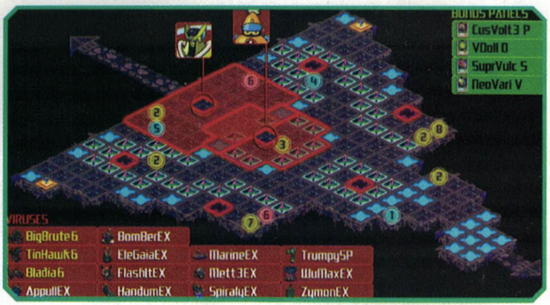
- The map has an error, the #2 and #7 by the bottom left Dark Hole are supposed to be swapped.
- Items:
| Item Panels | Bonus Panel Chips |
|---|---|
|
|
Mission 6: Undernet 4
- Boss: Dark ProtoMan (TP) / Dark Colonel (TC)
- Team Members:
- TP: MegaMan, GyroMan, NapalmMan, SearchMan, Meddy
- TC: MegaMan, ShadowMan, TomahawkMan, NumberMan, ToadMan
- Completion Rewards:
| Phases | Item |
|---|---|
| 8 or less | Z Saver Z |
| 9 to 10 | (TP) ProtoMan B (TC) Colonel C |
| 11 or more | 5000z |
- Items:
| Item Panels | Bonus Panel Chips |
|---|---|
|
|
Post-game Missions
Mission 7: Nebula Area 1
- Boss: ShadeMan
- Team Members:
- TP: MegaMan, ProtoMan, MagnetMan, NapalmMan, SearchMan
- TC: MegaMan, Colonel, KnightMan, TomahawkMan, NumberMan
- Completion Rewards:
| Phases | Item |
|---|---|
| 10 or less | BlakWing W |
| 11 to 12 | ShadeMnDS S |
| 13 or more | 5000z |
- Items:
| Item Panels | Bonus Panel Chips |
|---|---|
|
|
Mission 8: Nebula Area 3
- Boss: CloudMan
- Team Members:
- TP: MegaMan, GyroMan, NapalmMan, SearchMan, Meddy
- TC: MegaMan, ShadowMan, TomahawkMan, NumberMan, ToadMan
- Completion Rewards:
| Phases | Item |
|---|---|
| 12 or less | Muramasa M |
| 13 to 14 | CloudMnDS C |
| 15 or more | 5000z |
- Items:
| Item Panels | Bonus Panel Chips |
|---|---|
|
|
Mission 9: Nebula Area 5
Note: In the GBA version, there are 2 Navis that can save, giving 2 saving opportunities per Phase. In the DS version, there is only the standard save once per Phase.
- Boss: CosmoMan
- While BlizzardMan appears at the Nebula Area 5 Liberation Mission, his defeat is not required to complete the mission.
- Team Members:
- TP: MegaMan, ProtoMan, MagnetMan, GyroMan, Meddy
- TC: MegaMan, Colonel, KnightMan, ShadowMan, ToadMan
- Completion Rewards:
| Phases | Item |
|---|---|
| 14 or less | Anubis A |
| 15 to 16 | CosmoMnDS C |
| 17 or more | 5000z |
- Items:
| Item Panels | Bonus Panel Chips |
|---|---|
|
|
